When preparing your design for professional printing, setting up your margins and bleed correctly in Canva is crucial to ensure nothing important gets cut off—and everything prints just as you intended. Here’s how to do it, step-by-step, using the following layout specifications:
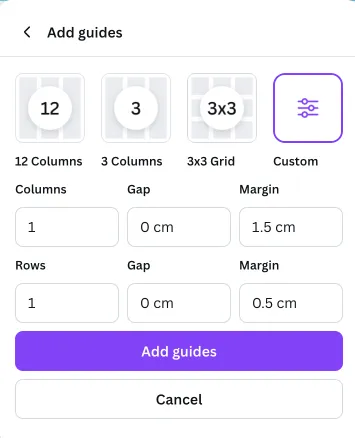
Column 1: Gap 0, Margin 1.5 cm
Row 1: Gap 0, Margin 0.5 cm
Add Bleed: -0.5 cm from all edges
Let’s break this down:
🔧 Step 1: Open Your Canva Project
Start by opening or creating your design in Canva. Choose the final print size you want (e.g., A4, A5, etc.)—you’ll add bleed and margin adjustments next.
📏 Step 2: Turn On Margins and Bleed
Canva makes it simple to visually manage margins and bleed:
Click on “File” in the top menu.
Tick “Show margins” – Canva will now show a faint border to indicate your margin area.
Tick “Show print bleed” – A dashed line will appear around the edge of your page to indicate bleed space.
🔍 Tip:Canva automatically adds a 3mm (0.3 cm) bleed.
🧮 Step 3: Manually Adjust for Margins and Bleed
🟣 Margins:
Canva’s default margin indicators are not customisable in measurement, but you can manually ensure content is within your desired safe zone:
Vertical (Column 1) Margin: 1.5 cm Use guides or shape boxes as references—drag vertical guides from the ruler (enable rulers under “File” > “Show rulers”) and place them 1.5 cm in from each side.
Horizontal (Row 1) Margin: 0.5 cm Similarly, drag horizontal guides 0.5 cm from the top and bottom.
✅ This ensures all important text and logos stay safely within the print area.
🔴 Bleed:
Since Canva defaults to a 3mm bleed, and you need 5mm bleed (-0.5 cm from all edges), you’ll need to do the following:
Extend all background colours, images, or full-bleed elements right to the edge, ensuring no important text, images or graphics are too close.
🎨 You can create a custom page size in Canva under Create a Design > Custom Size.
📤 Step 4: Download With Bleed and Crop Marks
Once your design is complete:
Click “Share” > “Download”
Select PDF Print as the file type.
Tick “Crop marks and bleed”
(Optional but recommended): Tick “Flatten PDF” for best print compatibility
Click Download
🖨️ Pro Tip:If the design looks low-quality on screen, it will likely print that way too. Always use high-res images and graphics.
✅ Final Checklist
Margins: 1.5 cm (sides), 0.5 cm (top and bottom) accounted for
Bleed: 0.5 cm extended beyond each edge
Important content safely within margin guides
Backgrounds and full-bleed images extend past bleed
Exported with crop marks and bleed
By following these simple steps, you can confidently set up your margins and bleed in Canva, ensuring professional results every time your design hits the press.